How to Create a Web Story by Writing Static AMP-HTML Code with Successful AMP Validation

Nitish Kumar Singh
Jan 5, 2024Hello developers! In this blog post, we will learn how to create a Web Story by writing AMP-HTML code following the AMP HTML Specification and validate our created Web Story.
If you are not familiar with Web Stories, read about them on amp.dev, creators.google, and my blog post on Web Story.
Web Stories code is written using AMP-HTML tags and must adhere to the AMP HTML Specification. AMP-HTML codes are not anything special; it's just like HTML code written using custom tags of AMP-HTML, and the head section is almost the same as HTML.
Before starting to code, let's first see a summary of AMP HTML Specification rules. You can explore more about these rules at AMP HTML Specification on amp.dev.
- Start with HTML5
<!doctype html>. - HTML opening tag must have
⚡ or ampattribute like<html ⚡>. - Must contain
headandbodytags, and the head section contains<meta charset="utf-8">as the first tag and<meta name="viewport" content="width=device-width, minimum-scale=1, initial-scale=1"/>. - It must be canonical of itself. For example, if this file is hosted on
https://example.com/my-story.html, then it must contain<link rel="canonical" href="https://example.com/my-story.html" />in its head. - Must contain
<script async src="https://cdn.ampproject.org/v0.js"></script>and<script async custom-element="amp-video" src="https://cdn.ampproject.org/v0/amp-video-0.1.js"></script>in the head, and more scripts as needed, like<script async custom-element="amp-story" src="https://cdn.ampproject.org/v0/amp-story-1.0.js"></script>for video playback. - Must contain the AMP boilerplate code
<style amp-boilerplate> .... </style>and<noscript> <style amp-boilerplate> .... </style> </noscript>in their head tag. I discuss it below. - We cannot use external stylesheets. We can only include one
styletag with the attributeamp-customfor internal CSS and also use inline CSS. - The
bodytag must have only one tag, and that isamp-story. - And AMP-HTML has many more limitations like naming of
classes,ids, using normal HTML tags.
The following code is the boilerplate of AMP-HTML:
<!DOCTYPE html>
<html ⚡>
  <head>
    <meta charset="utf-8" />
    <title>This is Title of our Web Story</title>
    <link rel="canonical" href="pets.html" />
    <meta name="viewport" content="width=device-width,minimum-scale=1,initial-scale=1"/>
    <style amp-boilerplate>
      /* here is amp-boilerplate style code*/
    </style>
    <noscript>
      <style amp-boilerplate>
        body {
          -webkit-animation: none;
          -moz-animation: none;
          -ms-animation: none;
          animation: none;
        }
      </style>
    </noscript>
    <script async src="https://cdn.ampproject.org/v0.js"></script>
    <script async custom-element="amp-story" src="https://cdn.ampproject.org/v0/amp-story-1.0.js"></script>
    <style amp-custom>
     /* here is custom css*/
    </style>
  </head>
  <body>
   <!-- here is all our story content written using amp-html tags and some html tags -->
  </body>
</html>
We can include the rest of metadata tags like description, og tags, and Twitter tags as a normal HTML file.
The following scripts load the AMP runtime script to run the Web Story and dynamically change our writing HTML. More scripts must be included as needed:
<!-- For AMP runtime -->
<script async src="https://cdn.ampproject.org/v0.js"></script>
<script async custom-element="amp-video" src="https://cdn.ampproject.org/v0/amp-video-0.1.js"></script>
<!-- If we use any video in story -->
<script async custom-element="amp-story" src="https://cdn.ampproject.org/v0/amp-story-1.0.js"></script>
The following is the code of style[amp-boilerplate] and noscript > style[amp-boilerplate]:
<style amp-boilerplate>
  body {
    -webkit-animation: -amp-start 8s steps(1, end) 0s 1 normal both;
    -moz-animation: -amp-start 8s steps(1, end) 0s 1 normal both;
    -ms-animation: -amp-start 8s steps(1, end) 0s 1 normal both;
    animation: -amp-start 8s steps(1, end) 0s 1 normal both;
  }
  @-webkit-keyframes -amp-start {
    from {
      visibility: hidden;
    }
    to {
      visibility: visible;
    }
  }
  @-moz-keyframes -amp-start {
    from {
      visibility: hidden;
    }
    to {
      visibility: visible;
    }
  }
  @-ms-keyframes -amp-start {
    from {
      visibility: hidden;
    }
    to {
      visibility: visible;
    }
  }
  @-o-keyframes -amp-start {
    from {
      visibility: hidden;
    }
    to {
      visibility: visible;
    }
  }
  @keyframes -amp-start {
    from {
      visibility: hidden;
    }
    to {
      visibility: visible;
    }
  }
</style>
<noscript>
  <style amp-boilerplate>
    body {
      -webkit-animation: none;
      -moz-animation: none;
      -ms-animation: none;
      animation: none;
    }
  </style>
</noscript>
And we can use custom CSS like below:
<style amp-custom>
  amp-story {
    font-family: "Oswald", sans-serif;
    color: #fff;
  }
  amp-story-page {
    background-color: #000;
  }
  h1 {
    font-weight: bold;
    font-size: 2.875em;
    font-weight: normal;
    line-height: 1.174;
  }
  p {
    font-weight: normal;
    font-size: 1.3em;
    line-height: 1.5em;
    color: #fff;
  }
</style>
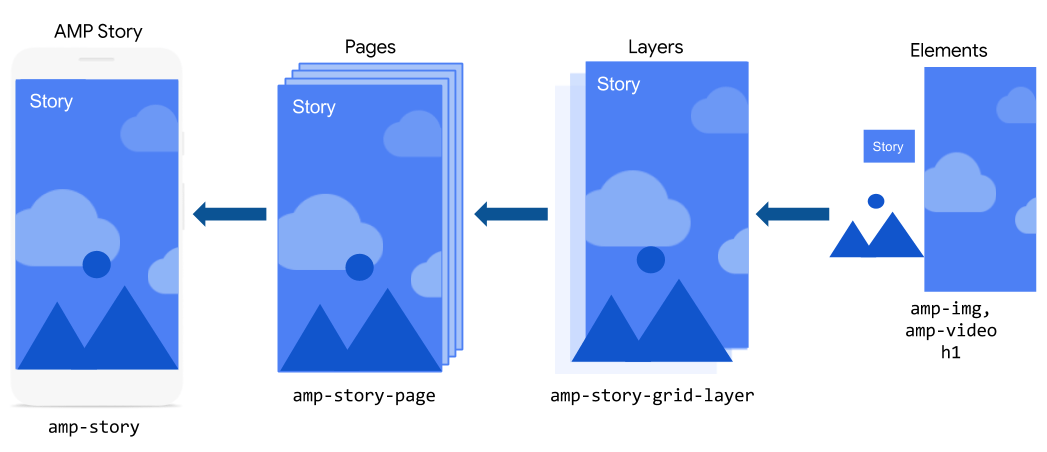
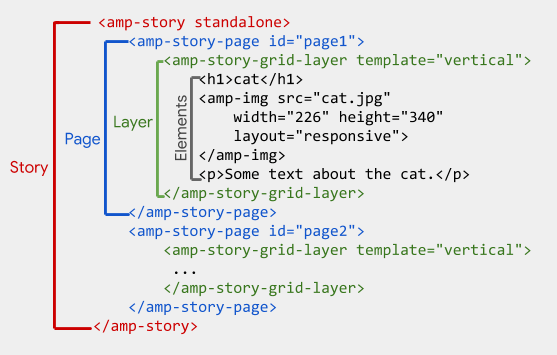
Now let's see how to code our main content. Web Stories are actually made by Pages, Pages made by Layers, and each layer contains our main content in HTML or AMP-HTML tags. The following images show how a Web Story actually looks in visual and code.


The first and only one child of the body tag is amp-story, which must have a standalone attribute and some more attributes for SEO, as shown in the code below:
<amp-story
  standalone
  title="Title of Web Story"
  publisher="Website Name"
  publisher-logo-src="URL of logo of website"
  poster-portrait-src="URL of cover pic of Web Story">
  <!-- here is story pages -->
</amp-story>
The title is our story's title, the publisher is our website name or whatever you want, publisher-logo-src is the logo of the website, and poster-portrait-src is the cover photo of our Web Story. The following image shows how these story metadata are used.
A Page is created by using the amp-story-page tag, and content is shown using an amp-story-grid-layer, and amp elements and HTML tags. A page can have multiple layers, and each layer is arranged one above the other according to its order in the amp-story-page tag.
Each layer's elements are arranged at different positions on the page using the template attribute of the amp-story-grid-layer tag. Following values can be used for the template attribute to arrange elements:
- fill: The fill template's value is used to make the layer completely fill the page. We use it to add a background image for pages.
- vertical: The vertical template's value is used to align elements in rows from top to bottom. We can change items' positions by applying
align-contenttoendfor the bottom,centerfor center, etc. - horizontal: The horizontal template's value is used to align elements in columns from left to right. We can change items' positions by applying
align-contenttoendfor the bottom,centerfor center, etc. - thirds: The thirds template divides the layer into three equal parts, and its child elements can be placed in any part by applying the
grid-areaattribute on elements toupper-third,middle-third, orlower-third.
We can add animation to any element just using the attribute and different values for different types of animations. For example, animate-in="fly-in-left", animate-in="fly-in-right", etc. You can find a full list of these animations from the Animating elements page on amp.dev.
The following code shows an example of the cover page of my Web Story. You can see this story here.
<amp-story-page id="cover">
  <amp-story-grid-layer template="fill">
      <amp-img src="https://images.unsplash.com/photo-1686852338517-3600831c95ea?crop=entropy&cs=srgb&fm=jpg&ixid=M3w1MDk0Nzl8MHwxfHNlYXJjaHwzNXx8YmFja2dvcnVuZHxlbnwwfHx8fDE3MDQ0MzU0NzF8MA&ixlib=rb-4.0.3&q=85&w=675" width="720" height="1280" layout="responsive"></amp-img>
      <div class="cr">
          <q>
              Photo by <a href="https://unsplash.com/@lucastodes" rel="noopener ugc nofollow" target="_blank" style="color: inherit;">Lucas Todeschini</a>
              on <a href="https://unsplash.com/?utm_source=medium&utm_medium=referral" rel="noopener ugc nofollow" target="_blank" style="color: inherit;">Unsplash</a>
          </q>
      </div>
  </amp-story-grid-layer>
  <amp-story-grid-layer template="vertical">
      <h1>Understanding Routing in Next.js App Router</h1>
  </amp-story-grid-layer>
  <amp-story-grid-layer template="vertical" class="bottom">
      <p>Let's explore routing in Next.js: understanding how to define routes, manage routing, delve into various special files in Next.js, and explore the different types of routes available.</p>
  </amp-story-grid-layer>
</amp-story-page>
In the above code, one layer is used with a fill template to set a background image, and the second and third layers are used with a vertical template to show the title and a brief message of the story. We can also fully customize each layer with CSS following AMP rules.
Similar to the above code, we create multiple pages. After creating all pages of a Web Story, we must validate this story by adding #development=1 in the story hosted URL and refresh the page in Chrome. For example, https://example.com/web-stories/my-first-web-story#development=1. If our Web Story has any AMP rules violation, then we see it on the screen and resolve it by following suggestions.
This is how we create a Web Story by writing a static AMP-HTML file, and we can host this file on any server.
However, this is a static HTML file, but we can create it dynamically on the server by fetching content from the database. I will write my next blog on how we can serve these stories using Next.js Route Handler and Appwrite for data storage.
I hope you learn and understand AMP-HTML and how to create a Web Story using AMP-HTML tags. For more information, you can visit and explore amp.dev. Happy Coding!


